- Definitions
- Requirements | How To Create a FiveM Server
- How to Install the FiveM Server Files
- Adjust Power Settings (on Windows)
- How to Add Content (Scripts, Mods, MLOs) to the Server
- Configuring Your FiveM Server
- Connecting to Your Server (The First Time)
- Adding New Resources
- Setting Up Rules for your Server
- Creating a Whitelist
- How To Get New Players to your Server
- The Next Steps (After Setup)
- FAQ | FiveM Servers
This tutorial explains how to create a FiveM server.
Creating a FiveM server is an excellent way to bring your own GTA V roleplay community to life, similar to NoPixel community.
In this easy-to-follow guide, I’ll walk you through the process of setting up your own FiveM server and detail the necessary requirements for hosting it. Additionally, I’ll cover what you need to do after your FiveM server is up and running, including creating a whitelist form and drafting rules.
Definitions

What is FiveM?
FiveM is a modification for GTA V that empowers players to use custom mods created by community developers. These mods can range from simple map changes to entirely new game modes. FiveM stands out from the base game by offering players greater control over their gameplay experience and supporting a larger number of players. Community-hosted FiveM servers are accessible through the FiveM server list.
While FiveM is widely known for its roleplay (RP) communities—where players assume specific roles in immersive stories or settings—it’s not limited to that. From serious to casual RP, servers like Nopixel have significantly contributed to FiveM’s popularity, especially among streamers.
What is a FiveM Server?
A FiveM server is a computer or dedicated server that runs the FiveM server software, allowing players to connect and play together. Setting up a FiveM server gives you full control over your gameplay environment, from selecting the mods to enforcing the rules. These servers can be hosted on various platforms including Windows and Linux computers, as well as through dedicated server hosting providers like OVH.
If you want to know how to create a FiveM server it’s crucial to understand what hardware and resources you’ll need; for instance, a server supporting 128 players might necessitate more RAM than you expected.
Interested in creating your own FiveM server? Follow our detailed guide below. We cover everything from initial installation and configuration to ongoing maintenance and useful tips to ensure a smooth experience for you and your players.
Requirements | How To Create a FiveM Server
To begin setting up a GTA 5 roleplay server on FiveM, you will require the following:
- a Server Hosting: A service like Zaphosting is recommended. Furthermore, check our hoster overview for more options. I recommend Zaphosting, Avoro or Ovh.
- Database Server: MySQL is commonly used and often integrated with hosting packages.
If you set up your server on Windows VPS, use XAMPP - Server Files: Download the standard server files from FiveM | OR | use a server template for simplicity. This step ensures your server runs smoothly.
- Visual C++: Required if installing on Windows. However, Linux users do not need this.
- Server Name and Logo (Optional): Personalize your server. This helps in branding and attracting players.
Server Templates – Ready to play! (optional, recommended for a quick start though)
If coding isn’t your preference or you’re short on time, we recommend purchasing a full server preset to kickstart your server setup. Recommended if you are looking for a quick start.
-
 NoPixel 4.0 (QBCore) ORIGEN V2ready to playUrsprünglicher Preis war: $320.00$299.00Aktueller Preis ist: $299.00.
 -
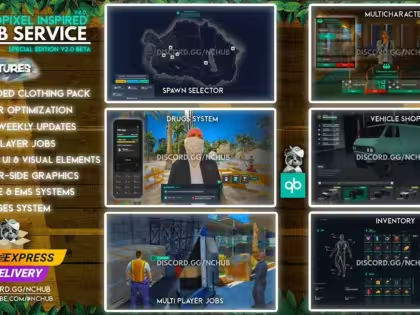 NCHUB V2.0 | NoPixel Inspiredready to playUrsprünglicher Preis war: $399.00$299.00Aktueller Preis ist: $299.00.
 -
 QBCore V5ready to playUrsprünglicher Preis war: $299.00$259.00Aktueller Preis ist: $259.00.
 -
 QBCore NoPixel 3.5 Inspired Server V2ready to playUrsprünglicher Preis war: $300.00$200.00Aktueller Preis ist: $200.00.
 -
 NoPixel 4.0 inspired – Serverready to playUrsprünglicher Preis war: $300.00$200.00Aktueller Preis ist: $200.00.
While using a template isn’t required, it’s often a good idea to begin with one!
Server Hosting | Choosing a Hosting Provider
Selecting the appropriate hosting option is essential for establishing your FiveM server, as it affects performance, reliability, and scalability.
Most people start by renting a Zaphosting server. < Click the link to rent on Zaphosting

If you prefer another host, go for Hetzner or OVH – both hosters are the best options – but you have to set up the server by yourself, while Zaphosting has a Gameserver option (so everything is set up).
Is Zaphosting recommended? Yes, for the start, it is!
Recommended FiveM Hosting Providers are…
We tested & compared the best FiveM server hosters and published our outcome here:
https://fivem-mods.net/fivem-hosting-provider-comparison/
To sum up this post, The best hosting options for your FiveM server:
- OvhCloud (if you are technically skilled)
- Hetzner (if you are mediate experienced)
- Zap Hosting (if you are a beginner and starting out with FiveM!)
It’s worth noting that Zaphosting provides an administration panel, while OvhCloud and Hetzner necessitate some technical expertise for server setup. However, if you’re able to configure the servers on your own, you’ll benefit from more powerful options with OvhCloud and Hetzner.
How to Install the FiveM Server Files
- Create a New Folder:
- Create a new folder on your desktop or preferred location.
- Example:
D:\FXServer\server. This directory will be used for your server.
- Download the Latest Version of FiveM Artifacts Server:
- Extract the Files:
- Extract the downloaded files into the created directory (
D:\FXServer\server).
- Extract the downloaded files into the created directory (
- Download and Extract cfx-server-data:
- Download cfx-server-data and extract it into a new folder.
- Example:
D:\FXServer\server-data.
- Create a server.cfg File:
- Create a
server.cfgfile in theserver-datafolder. - Example configuration file: example server.cfg.
- Create a
- Generate a New FiveM Server Key:
- Set the Server License in server.cfg:
- Add the generated license key to the
server.cfgfile:sv_licenseKey "yourLicenseKeyHere"
- Add the generated license key to the
- Start the Server:
- Navigate to the
server-datafolder and start the server using the appropriate command.
- Navigate to the
By following these steps, you’ll have your FiveM server up and running in no time, ready for an exciting experience!
Adjust Power Settings (on Windows)
If you’re running your FiveM server on a Windows operating system, it’s crucial to change the Power Settings from “Balanced” or “Power Saver” mode to “High performance.”
This adjustment ensures that your server operates at its maximum potential without any performance limitations.
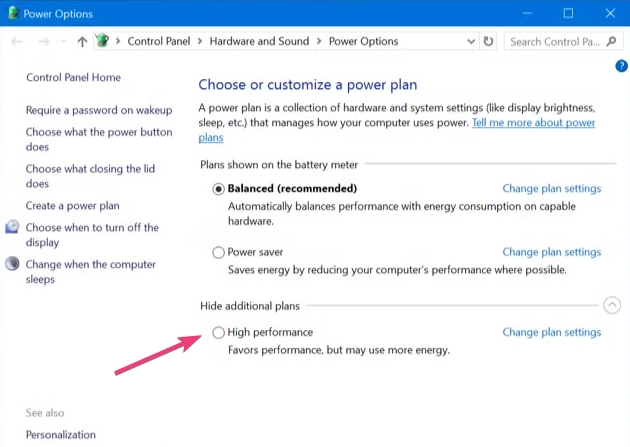
Follow these steps to change the Power Settings:
- Open the Control Panel: Press the
Windows keyand type “Control Panel” in the search bar, then click to open it. - Go to Power Options: In the Control Panel, select “System and Security,” then click on “Power Options.” This will display the available power plans.
- Choose “High performance”: In the Power Options menu, you’ll see several power plans listed. Select “High performance” to boost your system’s performance. If you don’t see it, click “Show additional plans” to reveal it.
- Confirm the Change: Once “High performance” is selected, the settings will automatically adjust. You can now close the Control Panel.
This ensures that your system allocates the maximum resources for your server, reducing lag and improving gameplay experience.
How to Add Content (Scripts, Mods, MLOs) to the Server
You can add new scripts, mods or MLOs to your FiveM server. I’ll show you how:
Why doing so? Well, adding new content like scripts, mods, or MLOs to your FiveM server can greatly enhance the player experience (the fun your players have) and make your server unique.
- Prepare Your Server
- Download Content
- Get scripts, mods, or MLOs from trusted sources.
- Check for required dependencies.
- Install Scripts
- Upload the script folder to
server-data/resources. - Add
ensure script_nametoserver.cfg. - Restart the server.
- Upload the script folder to
- Install Mods
- Upload mod files to a new folder in
resources. - Configure
fxmanifest.luaor__resource.luaif needed. - Add
ensure mod_nametoserver.cfgand restart.
- Upload mod files to a new folder in
- Install MLOs
- Place MLO files in
resources. - Add
this_is_a_map 'yes'to the manifest file. - Update
server.cfgwithensure mlo_nameand restart.
- Place MLO files in
- Troubleshooting
- Double-check paths and dependencies.
- Resolve any conflicts or errors.
Trusted Sources for FiveM Scripts, Mods, or MLOs
- Our site – obviously fivem-mods.net – A trusted site for new resources. The community loves us.
- GTA5-Mods.com – Popular website for GTA V mods, including FiveM content.
- FiveM Forums (Releases Section) – https://forum.cfx.re/c/releases/7 – Community-driven resource for FiveM scripts, maps, and more.
As said, I dislike Tebex for many reasons
Configuring Your FiveM Server
Editing the Server Config (.cfg)
Next, there are many variables of the server from within the server.cfg file. Before making any edits, ensure your server is turned off. Once edits are made, you are finally allowed to restart the server.
Example server.cfg:
# you probably don't want to change these!
# only change them if you're using a server with multiple network interfaces
endpoint_add_tcp "0.0.0.0:30120"
endpoint_add_udp "0.0.0.0:30120"

# These resources will start by default.
ensure mapmanager
ensure chat
ensure spawnmanager
ensure sessionmanager
ensure fivem
ensure hardcap
ensure rconlog
ensure scoreboard

# This allows players to use scripthook-based plugins such as the legacy Lambda Menu.
# Set this to 1 to allow scripthook. Do note that this does _not_ guarantee players won't be able to use external plugins.
sv_scriptHookAllowed 0

# change this
rcon_password {RCON_PASS}

# Set an optional server info and connecting banner image url.
# Size doesn't matter, any banner sized image will be fine.
#sets banner_detail "https://url.to/image.png"
#sets banner_connecting "https://url.to/image.png"

# Uncomment this line if you do not want your server to be listed in the server browser
# Do not edit it if you *do* want your server listed
#sv_master1 ""

# Loading a server icon (96x96 PNG file)
#load_server_icon myLogo.png

# Set your server's hostname
sv_hostname "My new Dockerized FXServer"

# Add system admins
add_ace group.admin command allow # allow all commands
add_ace group.admin command.quit deny # but don't allow quit
add_principal identifier.fivem:1 group.admin # add the admin to the group

# Hide player endpoints in external log output.
sv_endpointprivacy true

# Server player slot limit (must be between 1 and 32, unless using OneSync)
sv_maxclients 32

# Steam Web API key, if you want to use Steam authentication (https://steamcommunity.com/dev/apikey)
# -> replace "" with the key
set steam_webApiKey ""
Setting Yourself as Superadmin
Of course you want to admin permissions to moderate your server. Here’s how you can make yourself admin:
- First, Connect to your FiveM server.
- Then, open the player’s dialog (press arrow up, F10, or F11).
- Afterwards, Find your user ID.
- Ultimately, open the server console and type:
setgroup USERID superadmin.
Generating a Steam API Key
If using a framework like ESX, you may need a Steam API key:
- Visit the Steam API key site.
- Log in with Steam.
- Enter a domain name (your server name).
- Finally, copy the generated key and paste it into the server.cfg file.
Enabling OneSync
To enable OneSync:
- First, find your startup parameters (Startup file or Game Panel).
- Then, add
+set onesync onor enable OneSync in the Game Panel. - Finally, restart your FiveM server
If you’re on a Windows server, right-click the .bat file to edit it.
Connecting to Your Server (The First Time)
- Locate Your Server Address: Once you have your FiveM server connection address (CFX/IP address), you’re ready to connect.
- Connect via FiveM Client:
- Open the FiveM client.
- Navigate to “Servers”.
- Enter your CFX/IP address and connect.
By following these steps, you’ll now have your FiveM server created & running, ready for players to join and enjoy!
How To Make Your FiveM Server Popular (How to get players)
Adding New Resources
- Access the server configuration file: The configuration file is usually named
server.cfgand is located in the main directory of your FiveM server. - Edit the server configuration file: Open
server.cfgwith a text editor (such as Notepad++ or VS Code). - Add the resource: At the end of the
server.cfgfile, add a new line with the following command to start the resource:start resourceNameReplaceresourceNamewith the actual name of the resource folder you uploaded. For example, if the folder is namedcoolcar, you would add:sqlstart coolcar - Save and close: Save the changes and close the text editor.
If your’re looking for new resources, check out our store here!
Setting Up Rules for your Server
Before you publish your server, it’s essential to establish a clear set of rules to ensure a fair and enjoyable gaming experience for everyone involved. Key rules to consider include prohibiting Fail RP (Roleplay) and any form of cheating, as these can significantly detract from the immersive atmosphere you aim to create.
To help you navigate this process, we’ve put together a comprehensive tutorial that outlines best practices for rule-setting in gaming communities. This resource will guide you through the necessary steps to draft effective rules and maintain a positive environment. You can find the tutorial linked here for your convenience!
Creating a Whitelist
If you’re looking to safeguard your FiveM server from disruptive trolls and maintain a positive gaming environment, implementing a whitelist is an effective solution. This tutorial will guide you through the steps to create and manage a whitelist, ensuring that only approved players can join your server.
Why using a whitelist? By restricting access to trusted individuals, you can significantly reduce the risk of harassment and unwanted behavior, allowing for a more enjoyable experience for all participants. Follow along as we explore the necessary tools and settings to establish a secure and welcoming community on your FiveM server.
How To Get New Players to your Server
The Next Steps (After Setup)
How To Speed Up your FiveM Server ⚡
If you’re running a GTA server on FiveM, you may notice some slow issues with MySQL/database […]
Why Open Source: Transparency, Safety, Community
We believe in keeping things open, transparent, and community-focused. That’s why all our mods and tools […]
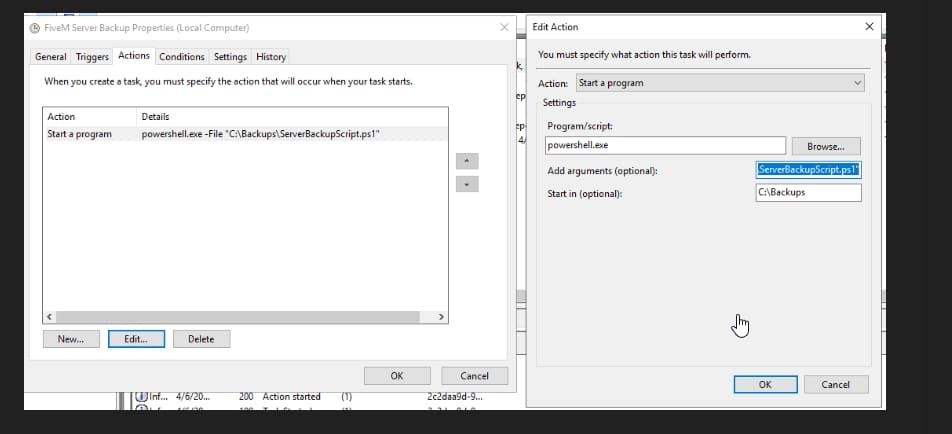
How to Automate FiveM Server Backups
In this tutorial, you will learn how to set up automated backups for your FiveM server […]
FAQ | FiveM Servers
What Type of Server can I create with FiveM?
You can create any server-type you want – Deathmatch, Roleplay (GTA RP) or Racing Server. We recommend creating a RP server!
What are the requirements to run a FiveM server?
To run a FiveM server, you’ll need a copy of Grand Theft Auto V, server hardware (a PC or a dedicated server), an internet connection, and the FiveM server software. Having a VPS or a dedicated server with good specifications is recommended for larger player counts.
Is it free to create a FiveM server?
Yes, setting up a FiveM server is free. However, if you choose to host your server on a dedicated machine or use a VPS (Virtual Private Server), there will be hosting costs involved.
How to make my server popular?
We wrote a tutorial about how your server gets the attention it deserves here:
How to get players
Can I monetize my FiveM server?
Yes, FiveM indeed allows server owners to monetize their servers through donations or paid memberships, as long as they follow FiveM’s community guidelines and terms of service.
Read more about it here
How to create a FiveM server fast?
Use our Complete FiveM Servers & you’ll be able to create a FiveM server within minutes!
Is Zaphosting recommended?
If you’re beginning to build a server, Zaphosting is recommended as it is the only hoster offering a game-panel. If you need stability, choose Ovh or Hetzner :)
Now you know How To Create a FiveM server! We hope you liked our tutorial :)



POSSIBLE DE VOUS CONTACTER POUR que vous puissiez code notre serveur ? je mettrais le prix veuillez me contacter sur mon adresse mail
bitte kann ich ihren server beitreten wenn ja
Hi Alex, was meinst du genau? :)
How can i play this on localhost
Hi, just download the server and install it like mentioned in the tutorial. No need to set it up differently on your PC, just do it the same way you would do it like just on your PC
Hi! We just updated our tutorial (2024)!
any help installing thru zap host PLEASSSE
This tutorial is very helpful and detailed for anyone looking to create their own FiveM server. It covers all the necessary steps and requirements, making it easy to follow along. Great job!
This article provides a helpful guide for choosing a hosting provider and setting up a FiveM server. The step-by-step instructions are clear and easy to follow. Great resource for beginners!
This article provides a clear and detailed guide on how to install scripts, mods, and MLOs for FiveM servers. It’s helpful to have trusted sources listed for these resources.
Great step-by-step guide for setting up a FiveM server! This is really helpful for beginners like me. Thank you!
This article provides helpful information for setting up a FiveM server, especially for beginners. It’s great that it recommends different hosting providers based on skill level. I appreciate the step-by-step guide for installing the server files and adjusting power settings. Overall, a useful resource for anyone looking to start their own FiveM server.
Great article with clear and detailed instructions on choosing a hosting provider and setting up a FiveM server. The tips on adjusting power settings and adding content are very helpful for improving performance and player experience.